Monday, November 4, 2013

100 Day Gluten Free Challenge: Wheat Belly

It was a couple years ago that I decided to change my diet and go Gluten Free.  My reason was health related as well as wanting to lead a healthier life.  I had developed poor eating, sleeping and exercise habits in college and as the years went on I experienced less energy as well as always feeling bloated and heavy.  My twin sister was the one to take the leap first.  I noticed how well she felt when she made the changes and figured we are twins, I would probably see similar changes in myself.

Note:  I have not been diagnosed with celiacs disease or a gluten sensitivity. However, both do exist and this is a personal choice to change my health and life.    

Some might think that going Gluten Free is a fad, much like low-fat, low-carb or other popular fad diets. Its possible that some think sooner or later "Gluten Free" will go out of style.  However, for those of us who have gluten sensitivities or full blown celiacs disease, we know that isn't the case.  Gluten free is a new lifestyle, a new way of cooking, shopping and nourishing you and your family.

Recently, I have fallen off the wagon, if you will, and fell back into old habits of starchy carbs and processed foods with preservatives, food dye and other toxins that aren't good for our bodies.  I have experienced low energy, lack of motivation, even my skin looked dull, old and quit frankly like a teenager going through puberty with lots of pimples.

Due to a few illnesses I started eating better, taking my vitamins and drinking more water.  I started feeling better and avoided catching air born illnesses from the children I nanny.  I credit this to healthy eating, mainly fresh fruit and vegetable, little carbs and cutting out most things with gluten in them.  I also noticed that my body was trimming up. I really hadn't done much exercise, but still noticed the fat around my belly diminishing and my skin, WOW, it looks 100 times better.  It's true what they say, "You are what you eat".  I was becoming junk food and looked like the oily processed c$@% I was feeding my body.

Which brings me to why I chose to do this challenge.  I want to be healthier.  Healthy body, skin and life. I'm not getting any younger and my body doesn't bounce back like it used to, therefore I need to pay more attention to what I feed my body and mind.

My challenge starts here, today!  I am beginning by reading Wheat Belly, by William Davis MD.  Also along with the book is a cookbook.  This cookbook is amazing!  I have already tried a few recipes.  Think gluten free means no bread, no pizza, no more delicious deserts like cupcakes? Think again!  I highly recommend anyone who is considering gluten free, or has to eat gluten free to read this book.

Here are a few of the main points that have really stood out to me so far are :

1. The wheat (which contains gluten) that is put into our products today has evolved.  Basically it has become a big, harry, green, monster and is no good for us.  Don't believe it?  Read the book and decide for your self.

2. Gluten free will change your health for the better; lower blood pressure, diminish or rid skin rashes, diminish or rid IBS or Irritable Bowl Syndrome, help with symptoms and control of diabetes.  These are just a few things people have seen improve with a gluten free diet.

3.  Changes mood, especially in children.   This one hits home for me. I don't have children yet, however I am a nanny.  The children eat a lot of junk food, candy, and processed foods.  I notice their behavior changes after eating these things and its not pretty. From temper tantrums to attitudes, hitting and biting they can completely loose it!

My intentions with this challenge is to provide a personal account of a gluten free diet and share it with others.  This is still a blog about design and I will incorporate the two into weekly posts. Starting with a post about organizing and designing your kitchen for a gluten free lifestyle.

So stay tuned and cheers to a healthy lifestyle!


Related Posts Plugin for WordPress, Blogger...

Thursday, May 9, 2013

{Lusting...tables!}

I some how have developed an infatuation with tables!  You might think why tables, but I will tell you there are so many options out there and depending on the use you may or may not have that perfect table.  For example, some of you may have kids, small kids, and a coffee table with square corners isn't exactly suitable for a child learning to walk.  Maybe you have removed the table from the living room completely.  But I say why not find a more kid friendly table!  Now obviously no table is kid proof but consider the shape and material and it may make your life easier and your child safer.

My infatuation started with this table.  Indestructible materials and a round shape make it kid appropriate.  I also love the industrial and rustic style combination that it displays with a metal base and wood plank top.


If I were a single lady, meaning I could style my home with any table I wanted, I would have a living room that incorporates a very hollywood chic table, like the one seen in this living room.  However, I am not single and I wish to remain married so this one will have to wait for a very special "woman cave"!  Who said men were the only ones with a "man cave"? :)


Those were a few classics.  Now to introduce the modern tables that I absolutely adore.  And don't think that just because you have an all rustic or traditional style home you can't incorporate modern. I love to mix it up...eclectic as designers call it!  Show off what you love and don't be limited by time periods or styles.  I feel it adds more interest!


Another modern design is the C-table.  I think they look a lot like a TV table, but with a lot more style!  They are designed so that they can tuck under you sofa on the end or either in front of the sofa.  The one on the left could be made at home, if you are a DIYer!  It's West Elm's Pipe Table. 


Then you have the ever so popular stump tables.  In my opinion these are very versatile. They can be used as a side table, put two or three together and make a coffee table or use it as a stool or some extra seating for guests.  Also the style can go with rustic design or modern design.  These are also a good DIY project!


Next up, the indoor/outdoor table.  Most of them are ceramic or metal and have a modern flare to it.  They are great for adding a pop of color in your living room and better yet they can be utilized all year round.  So, each season you have a "new" table :)  Re-designing with items you already have is obviously cheap and can freshen up your home!  Buy pieces that work in multiple rooms and you will be one happy designer!


The next two tables are just a few extras that I love.  They each have a very unique style and I'm not quit sure I could find a place to put them in my home...again my husband does have a say:)  But, I wanted to show them anyways.  The first one is a driftwood table base with a glass top.  Not kid friendly, but very fun and would look AMAZING in a beach home:)  (Maybe some day I will have a beach home!)

Okay, back to reality!
I am also showing the palette table, a very popular trend happening in home design.  Palettes are versatile, cheap and do have a "I found this in the garbage, what can I do with it" kind of charm.  I like what they've done with the palette table making it into a planter.  It has a built in center piece!  Once again I love double duty design:)


Last, but not least, the ultimate table I will some day have.  It's sturdy, purdy, and I can build it myself...  The farmhouse table!  It will seat multiple people, has rustic charm and is basically indestructible with kids.  Besides the wear and tear kids do will add character to it!


I can't decide which one I like best, the all wood table or the metal base table...maybe I'll make both! 

There you have it, my table crush!  What table is your favorite?  If I didn't show your style shoot me a message with a picture of a table you have fallen in love with!  I'd love to see it:)

Until next time...


P.S.  I'd love to help make your table crush a reality.  Contact me for design services!


Related Posts Plugin for WordPress, Blogger...

Friday, May 3, 2013

We're Buying Land & Building a House!

That's right, we have taken the plunge into home building!  It's said that "If your marriage can survive building a custom home then your marriage can survive anything."  I do believe that we will be living proof of that:)

The process has begun!  We have found and the INK is DRY on 20 acres of beautiful ground 30 minutes from Columbia and about an hour from St. Louis!  Our home will sit on the edge of farmed acreage and back up to 13 acres of beautiful woods.  The land also has a creek flowing around it and a modest sized pond in the middle.  In the future, our plan is to increase the size of the pond, plant a beautiful and edible garden and settle down with our future children and two dogs.

Aerial view.  The red line indicates the property line. 

Pond Dam                     
Farmed acreage
                         

ATV Trail

Private Drive.  The property is to the right in this picture.

Home building is a lengthy process.  The process of buying land has taken us a year.  We wanted to find a place that we could raise a family, be close to work and have a sanctuary to call home.  Next step, house plans!

Being an Interior Designer I have a well established list of what I want and what our family needs in a home.   My husband, who is a Construction Project Manager, also has his wants and needs. He has his list of priorities and I have my list.  Some things we agree on, some things we don't and some things we compromise on.  Give and take! Right? That's what marriage is all about and apparently home building too:)

Finally, after looking at several plans and picking out what we absolutely had to have, we have settled on a style we both like and preliminary house plans.  I love this part! It's so inspiring as a designer to design your own home from the ground up.  It's exciting to see our DREAMS coming true!

Here is a glimpse at the house plans thus far.  Like I said, these are preliminary plans, and in construction, plans usually and most likely will change.  In fact we have already changed where the house is going to sit...and I'm sure it will change again before we break ground.  But, isn't it EXCITING!


Main Floor Elevation
Basement Floor Plan


Front Elevation


The Adventure has just begun!  Looking forward to what the future holds.  Stay tuned for more details about our home build.

What do you think of the plans?  What's your favorite thing about it? Would you do anything different or did you do anything different when you built?  I'd love to hear from you so leave a comment!


P.S.  If you would like help creating a home you absolutely love, contact me about our design services.


Related Posts Plugin for WordPress, Blogger...

Wednesday, April 17, 2013

Babies Nursery: Will it be a Boy or a Girl?

My Brother and Sister-In-Law are having their second child!  I am so excited to be an Auntie again.  So, I bet you can guess who they asked to help design the new nursery...yep me!  I am so thrilled to be able to help out and better yet the design is going to be AMAZING!  My Sister-In-Law was inspired by a show on HGTv called Sarah 101.  What a great show!  If you haven't seen it you should check it out.

Don't you just love the non-tradional lighting she added!  And her use of multiple patterns is flawless.

Obviously her designs are inspiring!  I love that she's not afraid to use multiple patterns and bold colors.  We took our cue from her and chose a wonderful pattern for the wall.  My first approach was wall paper.  However, my SIL (Sister-In-Law) was a little scared when I mentioned the word "wall paper".  Naturally so, wall paper has a bad reputation for sticking around way too long and being hard to remove.  So I suggested we use a stencil and paint an all over design on a feature wall.  It's easy to do, easy to change, and has the same impact as wall paper.  

You are probably wondering what kind of pattern we chose for our stencil. My SIL decided she wanted a modern, yet subtle, safari themed room. Now, I'm not one for themed rooms, but I think if you choose the right patterns, textures, finishes and accessories it can be very classic. Besides, this is a child's room, so have a little FUN!  

We chose a zebra patterned stencil.  Stencils are great.  You can choose the colors you want and aren't stuck to patterns and colors in a wall paper book.  The sky is the limits with stenciling so reach for the stars.  I can't wait to show you how we chose to work our stencil colors!


They also have patterns like the ever so popular chevron stripes!

I had worked with stenciling before in a clients living room.  (I'll post a picture of that in the future when the room is complete)  Therefore, I went back to the same supplier because I was very happy with the quality of stencil, the affordability (much cheaper than wall paper) and they have tutorials on their website that are very easy to follow as a beginner.  Go to cuttingedgestencils.com and check out all the amazing patterns, inspiration and tips on stencils.

That's my bit about stencils, continuing on with the nursery.   With the concept of Modern Safari, I set out looking for some great staple pieces to anchor our design and a place to pop color.  Furniture is a great place to bring in a bold color choice and incorporate the modern style we want to achieve.  We have been on the hunt for a dresser.  One that can double as a changing station by simply adding a changing pad and some baskets for storage.  The great thing about a dresser as a changing table is it grows with the child and you aren't stuck with a changing table to get rid of when the child is grown.  

I have come across a few options on Craig's List...


The thriftyness in me has not purchased them yet. I am still haggling the price down.  But, either of these are viable options because they have good bones, style and functionality.  It's important to remember, when you are buying something second hand or from a flea market, not to look at the color, finish or hardware, but pay attention to the basics: is it sturdy, does it meet the dimensions you need, is the style what you want and think of the possibilities of what it could be.  With these two options I know we will paint, change the hardware and maybe add some texture to the drawer fronts.  You don't have to buy items and use them literally.  Get creative and see what you come up with.  In addition, this dresser will provide excellent storage and is perfect from baby to child.  It's also the right height for a changing table.  

Our plan for the dresser is to paint it.  I bet you will never guess what color.  Go ahead take a wild guess!  We chose........KELLY GREEN!  Perfect for a girl or a boy and a hot new color trend.  It will give us a great pop of color and anchor the room.  We plan on painting the crib this color as well.  

Valspar- Field Time Green

Along with the green we have also chosen the wall color.  For the entire room we will paint the walls light, cool toned gray, Valspar's Tempered Gray.  On the feature wall, where we will pain the stencil, Tempered Gray will be our base color and the stencil color will be a pearlized white.  It is going to look fantastic!

That is it for now. Look for my next installment on the nursery.  We will have finished pictures of the painted furniture. Fabric samples for the crib bedding and hopefully the walls will be painted. Until then...


Related Posts Plugin for WordPress, Blogger...

Tuesday, April 9, 2013

Shredded Beef Tacos!

It's true there aren't enough hours in the day to get everything done! One way I make life easier on myself is to use the crock pot for dinners.  I want my nights to be free!  Free to either spend time with my family or take care of other tasks around the house.  Insert the crock pot into your life and you've found the perfect solution.  In this recipe I used the oven as my "crock pot".

The recipe was passed on to me by a friend.  She had made it one night for her family and I just happened to be there when it came out of the oven. The only thing I could say was "Wow!" It was so juicy and tender and it melted in your mouth.  So, I stole the recipe and planned the perfect night to use it...a Friday night!  I knew I wouldn't want to come home from work and cook, and with a busy weekend ahead I knew there would be left overs.

What a great idea I had, because my family ate four wonderful meals from one recipe!  That's five adults eating four meals...I know I couldn't believe it either.  Even better if you don't want to eat it for five days straight you can always freeze it and use it later!  Imagine if it was just you and your husband or you and your kids...you would probably turn into a taco from the amount of beef it makes.  The best part is you don't have to do just tacos...the options are endless!  Endless I tell ya...well at least it is for those who are creative with food.  That's where I struggle, but my husband is wonderful at it:)  Here's the recipe for tacos.


And this is how it looked on our dinner table!  I just love tacos...makes your plate so colorful!
That's right!...you see strawberries on the taco.  A delicious, sweet opposition the salty beef:)

My Wonderful Husband...Ladies don't swoon too fast!

As you can see the tacos are delicious and everyone enjoyed them.  I especially liked that they could feed a large family several meals or can be frozen.  We also made home made Beef Stroganoff with the leftovers.  Boil some noodles, gluten free for us, and steam some broccoli and you have another delicious meal.

Rescue Recycle Reinvent
xoxo
Alissa


Related Posts Plugin for WordPress, Blogger...

Thursday, March 28, 2013

Breathe New Life Into a Bland, Builders Box Bathroom

Have you ever come across a builders grade bathroom that you liked?  The use of cheap cabinetry, ugly fiberglass showers, and that fake marble countertop really makes me cringe.  You're lucky if you have tile floors, most are vinyl!  So what do you do to upgrade?  You could completely start from scratch.  Guy the bathroom and start over.  However, most of us don't have the professional skills to move plumbing, nor do we have the time or money to do a total makeover.  Let's face it hiring a contractor is not cheap and how do you know that the job will be done right?  I say DIY!  Basic tiling skills, some fresh paint, and new fixtures can bring a less than par bathroom out of the ugly builders era and into a stylish, updated look.

One of my clients has serval of these bathrooms that desperately need to be updated, but not break the bank.  

Creative Brief:

1. A fresh coat of paint
2. Tile around the shower to give it a custom look.
3. Tile backsplash- Brings attention away from outdated countertop that is not being replaced.
4. Updated fixtures- Change out the lighting and bathroom accessories.
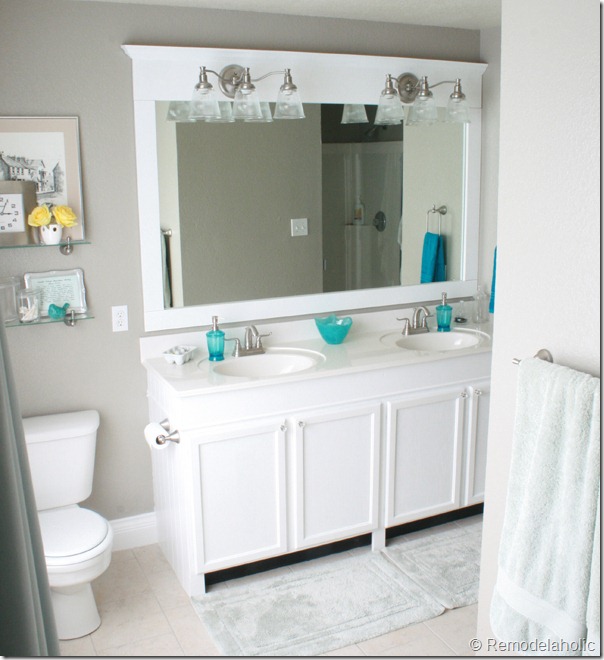
5. Frame out mirror- You could replace the mirror, but you might damage the wall and framing it out allows you to add some architectural details.  Here are a few ideas I came across while researching ideas to update the bathroom.


Free Hanging, Modern framed mirror.

Existing mirror has been framed in place.
Allows you to work with what you have and you don't have to worry about seven years of bad luck!
 In addition, the trim and molding add architectural detail to the room in an inexpensive way.

This is also an option, with an art deco or hollywood glam style.
 A classic frame placed on top of the existing mirror.   

6. Tile floor- Last step insures the tile and grout have the right amount of time to cure and the project remains on schedule.
7. Find Multifunctional Small space solutions.
8. Purchase new towels and accessories- Easiest and most inexpensive way to breath new life.

Bathroom Accessories:  Collection Found at Home Depot


With the tile and layout all finalized it was time to start the process. Since we weren't doing a complete remodel, just a redesign, there wasn't any demolition to be done at this point.  Just clearing out the space and removing any hardware so that we could tile.


Check back for bathroom updates and the BIG reveal!  It will definitely look fabulous when we are done!

Rescue Recycle Reinvent
xoxo,
Alissa


Related Posts Plugin for WordPress, Blogger...

Monday, March 25, 2013

A Little Spray Paint, a Little Garage Sale Table...

I have been helping my mother remodel/redecorate her house.  Fifteen years later, her house is overdue for a makeover.  It needs updating and the first place we started was her All Season Room.  It's still a work in progress, but I had to share the table we revamped.  A great project that shows how easy and inexpensive it is to Recycle objects.  The table was purchased at a garage sale for $45.  We took it from drab to fab in one day!

I LOVE spray paint... I'll say it again I LOVE SPRAY PAINT!  Spray paint can make anything look 100 times better.  A few cans of spray paint, spray on polyurethane, a little time and patience and you have an awesome NEW table!

A Few Tips:
1.To save your hand get an attachment that makes it easier to use spray cans.  They can be purchased at your local hardware store and are reusable.

Hand Saver
2.  Be sure to prime your project...it helps your topcoat cover better, thus using less paint.  I used grey primer because it's easier to cover when using darker top coats.  Consider a white primer for mid tone or light colors.


3. I used a clear, spray on polyurethane.  It took multiple coats to get the finish and protection I wanted.

Note: Polyurethane can tint things yellow therefore, if you are using a lighter color for example, mid tones like beige or cream, consider using a wax to seal your project.


Materials: Gray Primer, Navy Spray Paint, Clear Gloss Spray Polyurethane

Before...the finish was very uneven and the color was really orange.
After... A great pop of color and a more modern finish to a traditional style piece!

Stay tuned for the room reveal.  The All Season Room, which used to be an office, is now a wonderful oasis.  It includes extra seating for entertaining, a mini bar and a great reading spot!

Rescue Recycle Reinvent
xoxo,
Alissa

Related Posts Plugin for WordPress, Blogger...