Thursday, March 28, 2013

Breathe New Life Into a Bland, Builders Box Bathroom

Have you ever come across a builders grade bathroom that you liked?  The use of cheap cabinetry, ugly fiberglass showers, and that fake marble countertop really makes me cringe.  You're lucky if you have tile floors, most are vinyl!  So what do you do to upgrade?  You could completely start from scratch.  Guy the bathroom and start over.  However, most of us don't have the professional skills to move plumbing, nor do we have the time or money to do a total makeover.  Let's face it hiring a contractor is not cheap and how do you know that the job will be done right?  I say DIY!  Basic tiling skills, some fresh paint, and new fixtures can bring a less than par bathroom out of the ugly builders era and into a stylish, updated look.

One of my clients has serval of these bathrooms that desperately need to be updated, but not break the bank.  

Creative Brief:

1. A fresh coat of paint
2. Tile around the shower to give it a custom look.
3. Tile backsplash- Brings attention away from outdated countertop that is not being replaced.
4. Updated fixtures- Change out the lighting and bathroom accessories.
5. Frame out mirror- You could replace the mirror, but you might damage the wall and framing it out allows you to add some architectural details.  Here are a few ideas I came across while researching ideas to update the bathroom.


Free Hanging, Modern framed mirror.

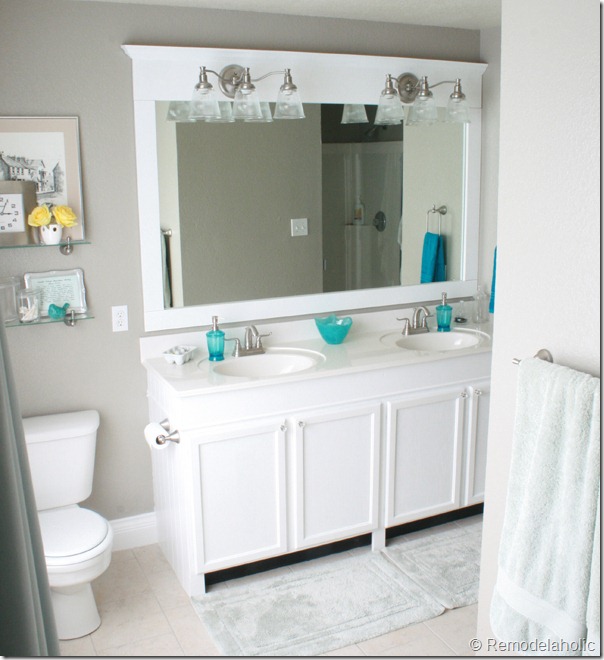
Existing mirror has been framed in place.
Allows you to work with what you have and you don't have to worry about seven years of bad luck!
 In addition, the trim and molding add architectural detail to the room in an inexpensive way.

This is also an option, with an art deco or hollywood glam style.
 A classic frame placed on top of the existing mirror.   

6. Tile floor- Last step insures the tile and grout have the right amount of time to cure and the project remains on schedule.
7. Find Multifunctional Small space solutions.
8. Purchase new towels and accessories- Easiest and most inexpensive way to breath new life.

Bathroom Accessories:  Collection Found at Home Depot


With the tile and layout all finalized it was time to start the process. Since we weren't doing a complete remodel, just a redesign, there wasn't any demolition to be done at this point.  Just clearing out the space and removing any hardware so that we could tile.


Check back for bathroom updates and the BIG reveal!  It will definitely look fabulous when we are done!

Rescue Recycle Reinvent
xoxo,
Alissa


Related Posts Plugin for WordPress, Blogger...

Monday, March 25, 2013

A Little Spray Paint, a Little Garage Sale Table...

I have been helping my mother remodel/redecorate her house.  Fifteen years later, her house is overdue for a makeover.  It needs updating and the first place we started was her All Season Room.  It's still a work in progress, but I had to share the table we revamped.  A great project that shows how easy and inexpensive it is to Recycle objects.  The table was purchased at a garage sale for $45.  We took it from drab to fab in one day!

I LOVE spray paint... I'll say it again I LOVE SPRAY PAINT!  Spray paint can make anything look 100 times better.  A few cans of spray paint, spray on polyurethane, a little time and patience and you have an awesome NEW table!

A Few Tips:
1.To save your hand get an attachment that makes it easier to use spray cans.  They can be purchased at your local hardware store and are reusable.

Hand Saver
2.  Be sure to prime your project...it helps your topcoat cover better, thus using less paint.  I used grey primer because it's easier to cover when using darker top coats.  Consider a white primer for mid tone or light colors.


3. I used a clear, spray on polyurethane.  It took multiple coats to get the finish and protection I wanted.

Note: Polyurethane can tint things yellow therefore, if you are using a lighter color for example, mid tones like beige or cream, consider using a wax to seal your project.


Materials: Gray Primer, Navy Spray Paint, Clear Gloss Spray Polyurethane

Before...the finish was very uneven and the color was really orange.
After... A great pop of color and a more modern finish to a traditional style piece!

Stay tuned for the room reveal.  The All Season Room, which used to be an office, is now a wonderful oasis.  It includes extra seating for entertaining, a mini bar and a great reading spot!

Rescue Recycle Reinvent
xoxo,
Alissa

Related Posts Plugin for WordPress, Blogger...

Wednesday, July 11, 2012

One Mans Trash is Another Woman's Treasure!

Yesterday, Tuesday July 10th, I went to a local auction that has great thrift finds.  I spent $51 and bought several items, three of which are upholstered side chairs that just need some TLC!

FREE...Dumpster Diving!
Metal Horses...$4 ea.
              
                                             
Freezer Baskets (3)...$6 for all
Wooden Rocking Horse...$10
                 
                                   
Sewing basket (I wanted the contents)...$3
Metal Platters...$3 for the pair
                          
Empty Wooden Frames...$6 for all
Picnic Basket...$4
                                        
These finds are so exciting and now I can see why this could become an addiction... Great Finds, Good Times and it allows your imagination to flow!

This was my first time to an auction, but it's really easy. So, here are a few tips for first time auction goers...

Ground rules:

*Know your budget.   

*Get there early to scope out the items and your fellow auction goers.

*Have in mind your maximum bid you will have for each item.

*This is an auction, items come and go and like the fish in the sea, there are more where they came from.  If you loose an item this time know that you will probably see it again or something similar.  

*If you do loose an item and really have to have it, usually the winner will sell it to you right at auction, know that they will price it higher than what they paid.

*HAVE FUN!

Tips when bidding:

1. Never take the first bid thrown out by the auctioneer...(this is important because they will start higher than they really want so wait until they bring the beginning bid down)

2. Know your fellow auction goers.  This doesn't mean you have to know them all individually or their name, but it does mean be observant.  

3. Grouped items auction- Grouped items auction will auction off a group of items that may be three chairs or matching pictures or they may have no relation because they want to speed up the auction (no one wants to be there all day).  Pay attention during these auctions...you could loose an item you really wanted.

4. Open auction- Open auctions are auctions that cove almost all the items in that square, table or aisle.  These are great auctions to get stuff for a $1 or $2 even large items you thought you might pay close to $20 or $30.  For instance I got three side chairs for $9.  

I hope you find these tips helpful.  Until next time... "Live the Dream"!


Rescue Recycle Reinvent
xoxo,
Alissa 


Related Posts Plugin for WordPress, Blogger...

Monday, July 9, 2012

Bench!

My husband and I just finished this bench for our bedroom.  I saw a post on Pinterest that inspired me to design a bench for the end of our bed.


I have been wanting a bench or chest of some sort to add to our master bedroom.  It turned out AMAZINGLY and was crafted out of old oak we reclaimed from my husbands family farm.  So PROUD!

Bench Frame...almost done!
                                                                       
Wooden Dowel Detail.  My husband is an AWESOME furniture builder!                                          
Ready to upholster!  Just cut plywood to the size of your bench.  Materials you will need: 3" or more foam, 1" batting, and upholstery fabric of your liking, a staple gun (I recommend electric or pneumatic to save your hands), screw driver for any staples that don't seat right and need to be removed and spray adhesive.  I used a canvas drop cloth that was bought at the hardware store.  Holds up well, is inexpensive and easy to replace.  Start by spraying your plywood and the foam.  Place foam on ply wood and press evenly all over to ensure adhesion.  The staple on batting.  Next is your material.  Start on one side in the center and work your way to the ends.  So this on each side and save the corners for last.  Be sure to pull tight and evenly all over.
At the end of the bed.
                                                 
Close up!
Enjoy your DIY projects!  Until next time...


Rescue Recycle Reinvent
xoxo,
Alissa


Related Posts Plugin for WordPress, Blogger...

Welcome, Aloha, !Hola!, God Dag!

Welcome to Hagan Home! I am EXCITED to start this new adventure and hope you all enjoy the inspiration and projects I will be blogging about.

First off I will share a little bit about my husband and myself.   I feel it only fair to include him because he is the gravy to my mashed potatoes...lol!  Without him a lot of these projects would have taken a few attempts and lot more time.

(my husband, our dog Sage and me on our wedding day. September 25th, 2010.  Almost two years!)

Me:  My background, schooling, is in Interior Design.  I attended the University of Missouri, Columbia where I earned a Bachelors of Science in Human Environmental Studies, with an emphasis in Interior Design and a Fine Arts Minor, emphasis in photography.  I have always been the art loving and crafty type.  I enjoy the outdoors and have expanded my design skills to landscape design as well.  My favorite or most passionate thing about design today is turning old into new.  I also enjoy designing for champagne taste on a beer budget!

My husband (Ian):  Ian earned his Bachelors degree in Construction Management from the University of Central Missouri in Warrensburg.  He is very skilled in wood working and is an avid hunter.  He currently works for a construction company as a Project Manager overseeing large construction projects like schools, churches and jails...Funny combination:)  One of his dreams is to have an at home wood shop, where he can build fine, custom, furniture and sell it!  You will love some of the pieces he has built...they are amazing and beautiful!


Together:  We are unstoppable!  Our dreams is to finish remodeling our current home in about a year and sell it so that we may purchase land in the country side, build our dream home and have lots of babies... (lots of babies is my dream, haven't quit sold him on that one yet!)

We work as a well oiled machine, designing, crafting and remodeling.  Yes, we have our disagreements, often over style, finish, color and execution, but together we are better.  That's why I say "he is the gravy to my mashed potatoes"!  (He is the "reason" to my insanity!)

Currently, as mentioned before, we are slowly remodeling our home that we have owned for approximately five years.  What's left to do?   well, here is the short list... (1) remodel second bathroom, (2) finish trim work in basement, and bedrooms, (3) new interior doors and hardware (4) finishing touches.  I say the short list because this is what we HAVE to get done, the long list is what I WANT, but can live without and we can sell the house without!

To wrap it up,  this is a new adventure for a couple of rehearsed DIYers.  We hope that our projects inspire and bring happiness to your life as much as they have to ours.


Rescue Recycle Reinvent
xoxo,
Alissa


Related Posts Plugin for WordPress, Blogger...