Thursday, March 28, 2013

Breathe New Life Into a Bland, Builders Box Bathroom

Have you ever come across a builders grade bathroom that you liked?  The use of cheap cabinetry, ugly fiberglass showers, and that fake marble countertop really makes me cringe.  You're lucky if you have tile floors, most are vinyl!  So what do you do to upgrade?  You could completely start from scratch.  Guy the bathroom and start over.  However, most of us don't have the professional skills to move plumbing, nor do we have the time or money to do a total makeover.  Let's face it hiring a contractor is not cheap and how do you know that the job will be done right?  I say DIY!  Basic tiling skills, some fresh paint, and new fixtures can bring a less than par bathroom out of the ugly builders era and into a stylish, updated look.

One of my clients has serval of these bathrooms that desperately need to be updated, but not break the bank.  

Creative Brief:

1. A fresh coat of paint
2. Tile around the shower to give it a custom look.
3. Tile backsplash- Brings attention away from outdated countertop that is not being replaced.
4. Updated fixtures- Change out the lighting and bathroom accessories.
5. Frame out mirror- You could replace the mirror, but you might damage the wall and framing it out allows you to add some architectural details.  Here are a few ideas I came across while researching ideas to update the bathroom.


Free Hanging, Modern framed mirror.

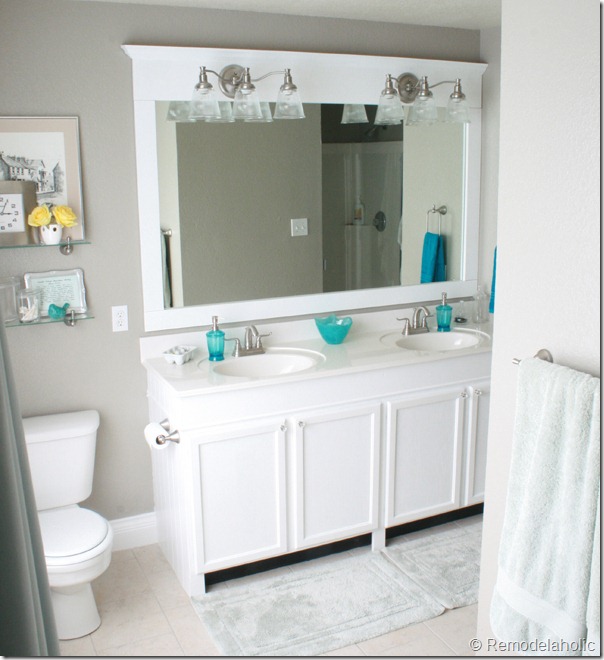
Existing mirror has been framed in place.
Allows you to work with what you have and you don't have to worry about seven years of bad luck!
 In addition, the trim and molding add architectural detail to the room in an inexpensive way.

This is also an option, with an art deco or hollywood glam style.
 A classic frame placed on top of the existing mirror.   

6. Tile floor- Last step insures the tile and grout have the right amount of time to cure and the project remains on schedule.
7. Find Multifunctional Small space solutions.
8. Purchase new towels and accessories- Easiest and most inexpensive way to breath new life.

Bathroom Accessories:  Collection Found at Home Depot


With the tile and layout all finalized it was time to start the process. Since we weren't doing a complete remodel, just a redesign, there wasn't any demolition to be done at this point.  Just clearing out the space and removing any hardware so that we could tile.


Check back for bathroom updates and the BIG reveal!  It will definitely look fabulous when we are done!

Rescue Recycle Reinvent
xoxo,
Alissa


Related Posts Plugin for WordPress, Blogger...

Monday, March 25, 2013

A Little Spray Paint, a Little Garage Sale Table...

I have been helping my mother remodel/redecorate her house.  Fifteen years later, her house is overdue for a makeover.  It needs updating and the first place we started was her All Season Room.  It's still a work in progress, but I had to share the table we revamped.  A great project that shows how easy and inexpensive it is to Recycle objects.  The table was purchased at a garage sale for $45.  We took it from drab to fab in one day!

I LOVE spray paint... I'll say it again I LOVE SPRAY PAINT!  Spray paint can make anything look 100 times better.  A few cans of spray paint, spray on polyurethane, a little time and patience and you have an awesome NEW table!

A Few Tips:
1.To save your hand get an attachment that makes it easier to use spray cans.  They can be purchased at your local hardware store and are reusable.

Hand Saver
2.  Be sure to prime your project...it helps your topcoat cover better, thus using less paint.  I used grey primer because it's easier to cover when using darker top coats.  Consider a white primer for mid tone or light colors.


3. I used a clear, spray on polyurethane.  It took multiple coats to get the finish and protection I wanted.

Note: Polyurethane can tint things yellow therefore, if you are using a lighter color for example, mid tones like beige or cream, consider using a wax to seal your project.


Materials: Gray Primer, Navy Spray Paint, Clear Gloss Spray Polyurethane

Before...the finish was very uneven and the color was really orange.
After... A great pop of color and a more modern finish to a traditional style piece!

Stay tuned for the room reveal.  The All Season Room, which used to be an office, is now a wonderful oasis.  It includes extra seating for entertaining, a mini bar and a great reading spot!

Rescue Recycle Reinvent
xoxo,
Alissa

Related Posts Plugin for WordPress, Blogger...