Tuesday, January 28, 2014

Well Needed Vacay to Florida

Wish we were in Florida now.  These temperatures are in the single digits and are making my bones rattle from the cold!  If we can't be there, I can at least look at some pictures and warm up by visualizing!

I used to think that going on a trip over any holiday was something I would never do, but "never say never".  That's just what I did, went on vacation over the Thanks Giving Holiday.

My husband and I were invited, by some great friends, to join them for a week long holiday in sunny Florida, Sarasota Florida to be exact.  You can understand that we were so excited to escape the winter weather that the mid-west usually endures during the winter.  Unfortunately, it wasn't as hot and sunny as we would have liked, they were having some unusual weather for that time of year.  However, it was warmer than home and a well needed break before the chaos of building a home began.

We had a great time with good friends, sharing fun stories, good food and wine, and making memories.


Cheers!

xoxo,
Alissa
Related Posts Plugin for WordPress, Blogger...

Friday, January 24, 2014

Farm House Friday: Root Cellar

In past posts I talked of the excitement of country living for fresh garden foods and fresh eggs daily, in addition to that I am so excited because we were able to incorporate a root cellar into the design of our home.  This will ensure that we can have fresh fruits and vegetables all year round.  Better yet, I will learn to cook with some new ingredients.  Who knows, maybe we will have a new family favorite among vegetables.

Unsure of what a root cellar is?  Webster's Dictionary Online defines it this way: a room or large hole in the ground where vegetables (such as potatoes and carrots) are kept.  That's what we intend to use it for along with storing some fruits.  Root cellars are an ancient method to store long term the bounty of your farm and garden.  


Ancient Root Cellar
Historically, root cellars were holes in the ground with a an access door.  Some may remember your grandmother storing canned goods and vegetables in her homes basement or cellar, this is also a version of a root cellar.  In addition to storing food for long term, they are currently being rediscovered not only for storing purposes and eating fresh grown food, but for the possibility of reducing expenses and providing food during times of potential hardship. 

For our family we chose to build a root cellar for all of those reasons:  fresh food, long term food storage, reducing expenses, and most of all we know where the food comes from, how it was grown and the nutritional content is higher than any food found in the grocery store.  With all the chemicals (pest control), additives (artificial colors and sweeteners) and preservatives found in food today, the nutritional content is much lower than it was even ten years ago. I believe this is causing more health concerns, especially in children.  

Soap box rant over!  Onto our floor plan and where we intend for our root cellar to go.  We didn't have to do much to the plans to incorporate the root cellar.  The initial plans already had a front porch.  Under this porch there is dead space, space that wasn't going to be accessible at all.  Why would we waste that space?  Even if we didn't use it as a root cellar, if we added access to this space inside the house, it could act as a tornado shelter.  A great shelter being that it would be a room with concrete on all four sides, floor and ceiling.  Those characteristics also lend themselves to a great place for a root cellar.

Red Highlighted Area: Root Cellar

What I Have Learned So Far:

Where to start?  How do you build a root cellar?  What vegetables store well in a root cellar?  I had no clue, so I goggled it.  Fortunately the internet is a great source when researching something like this. However, my main source of information has come from a book that came highly talked about among articles on root cellars that I came across on the internet.  If you are in the root cellar business and need help getting started, I highly recommend buying this book: Root Cellaring: Natural Cold Storage of Fruits & Vegetables.

Here is what I have learned so far in regards to fruit and vegetables to grow and store.
1.  It all depends on your garden, location of the garden, garden soil and location on the globe.
2. Different fruits and vegetables perform differently in different parts of the globe.
3.  Crop rotation.
4. Seasonal Gardening: learn when to plant your fruits and vegetables.  Spring, Summer or Fall.
5. Trial and Error: Some will keep better than others.
6. It takes time so don't give up.  The first year or two you plant your garden you might not have a high success rate.  Don't give up, all the failure will lead to great success! 
7. Fruit and Vegetables give off certain gases that could cause the other to rot.  
8. Check your storage daily for any sign of mold or rot contamination and dispose of it immediately.  

I will post more about this as our project develops.  Would you put a root cellar in your home?  Leave a comment and let me know what would excite you the most about a root cellar of your own!

Happy Friday
xoxo,
Alissa

Related Posts Plugin for WordPress, Blogger...

Tuesday, January 21, 2014

A Home Made Wedding

Wedding season is behind us.  However, I wanted to share my twin sisters wedding that I planned and took place July 2013.  Between all the chaos it takes to plan a wedding and planning to build a house, I was able to pull it off and it looked beautiful.

Her fiancĂ© is from Norway, therefore he wanted a summer wedding. I about died when she told me this.  If you are from the Midwest, you know that summer time is HOT, especially summer in July! Well, not this year.  The summer Gods were with us and brought very cool, fair weather for the month of July.  Or maybe it was our family coming all the way from Norway that brought the nice weather. Whatever it was, we couldn't have asked for better temperatures!

Sarah (my sister) really wanted an outdoor wedding.  Fortunately I was able to talk her out of an outdoor wedding in July.  I have to say my case was made stronger when I found an amazing location, not too far from home, it had just the right amount of vintage and charm.


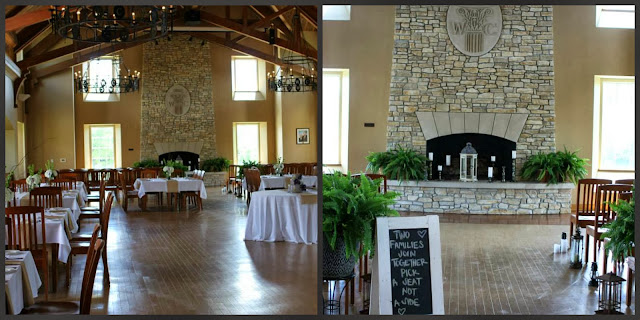
It was time to get planning.  First on my mind was the accessories or decorations.  Now this is right up my alley. I love to design and the space just needed some decorations to accent what was already there. Therefore, some flowers to accent the height of the room and some accessories to dress up the tables was all that was needed.  We used candles and lanterns to define the ceremony space.  In addition we brought in potted plants from home to add some softness and greenery. This is a great tip to save money on flowers.  

Another way to stay within budget is consider arranging centerpieces on your own.  This might be difficult if you don't have a green thumb, but I'm sure you can recruit a friend or family member that can help.  I do have a green thumb, but I also recruited my mother in law to help.  Without her it would have been an all-nighter for me.  We ordered flowers from Sam's club.  They have AMAZING fresh bulk flowers.  Their quality is outstanding and even delivery is a piece of cake. I highly recommend them if you choose to be your own florist.  

Since the room has amazingly tall ceilings we could make our centerpieces taller.  We also didn't have to worry about cluttering the tables, since they were large too.  The centerpiece in the front was a DIY project with little watering cans. We found these cans at the Dollar Tree and painted them all black.  Then we planted a variety of succulents, which are very fitting for the Summer season and I knew would last until the wedding.  The actual centerpiece was another DIY, and was arranged in a tall mason jar.  Flowers are from Sam's. 

We had a lot of extra flowers. So we created arrangements for other tables, like the guest book and gift tables. 
Brides Bouquet: Picasso Mini Cala Lilies.

Bridesmaid Boquets:  White and Green Hydrangea, Bells of Ireland, Succulents (Hens and Chicks), Berries, and Curly Willow Twigs.

Outside Terrace:  Citronella Lanterns.  A mid-summer wedding meant fighting the bugs at night. Don't make it uncomfortable for you guests and provide some bug repellant.

Outdoor Terrace Flowers.  We found these tin planters at the Dollar Tree and bought clearance flowers from the local nursery.  Be sure to plant your flowers about a month ahead of time so they can grow and fill in.  
As I'm sure you have concluded by now, the room lent itself very well to a vintage, rustic wedding decor. Burlap is very "in" right now and of course what is a vintage, rustic wedding without some burlap? Another DIY project, the runners were created for under $10 each.  We cut burlap to a length that would overhang the table by at least a foot on each end.  Then we sewed lace to both edges of the burlap runner.  For the bride, it wasn't important for all the lace to match, which was great because it was hard to find enough lace that matched, but mismatched lace related to the vintage, rustic vibe that we wanted.  After all vintage isn't always "matchy matchy", its what you can find and repurpose.  

DIY Chalkboards.  I found all the supplies at Hobby Lobby and make my own chalk paint.  Also featured, the burlap table runners.  

After the flowers and tables were handled there wasn't much left to do, but to add some accents to the fireplace and ceremony aisle.

The aisle was kept simple.  Ferns flanked each side of the beginning of the aisle and running down the aisle was a mash up of different lanterns.  We opted for different sizes and styles in lanterns to keep the vintage style cohesive.  Due to no open flame rules at the site, we had to use LED candles, but they worked out great because they were operated by remote.  
Last, but not least, I'll leave you with some pictures of the wedding party.  Hope you enjoyed the simplicity.

Grooms Cake (flown in from Norway) and Brides Cake (gluten free and delicious)

DIY Chalkboard:  This was up-cycled from my wedding.

The whole family:  Bride and Groom side including family from Norway

Flower Girls and Ring Bearers 
Bride and her Kiddos


DIY C-A-R-D sign.  Burlap, Lace, pearl string and some bow clips.
Berlin Wall at Westminster College, Fulton, MO

Sisters 


xoxo,
Alissa

All photos are copyright protected: Even When Photography

Related Posts Plugin for WordPress, Blogger...

Friday, January 17, 2014

Farm House Friday: What Comes First...the Chicken or the Egg?

Or the Chicken Coop?

Lately I have been thinking a lot about living in the country.  The downside…farther away from stores and more time in the car, the upside…more room for lots of animals (if you know me well you know I love dogs and if my husband allowed I would have a farm full of rescued pups).  Spacious country also allows room for a fresh garden to cook from and fresh free range chicken eggs.

One of the things I really look forward to is fresh eggs every morning.  Aside from the health benefits, its groceries right in our backyard.  Just imagine waking up, hopefully not because the rooster crows, brewing a cup of coffee and walking out to your backyard to scoop up some fresh eggs and then cooking a fresh breakfast for your family.  That puts a huge smile on my face:)

Naturally, my husband and I will be designing and building this coop ourselves, so I set out to do some research on the options for a chicken coop.  My champagne taste immediately had me salivating over fabulous pictures of chicken coops.  It also sparked my design nature and the wheels started turning…yep I am going to design our chicken coop, but first what do chickens actually need to survive?

There are differing opinions on whats best for chickens.  On one hand people believe chickens are naturally hardy and an "open-air school" philosophy is best.  Others believe that the health of chickens can be compromised by outdoor weather and they need to be in a controlled environment. I believe that striking a natural balance, being able to get out of the elements like snow, wind, rain, but also being able to "stretch their legs", is best. Much like humans, that benefit from the outdoors, I believe animals do too.

In researching chicken coop designs I have come across some pretty cool design ideas.  There is so much out there and lots of free designs to follow.  I love that I can build a coop that flows with the design of our house.  Just because its function-able doesn't mean it has to be ugly!

Some of my favorite Fancy Designs:


These others are very utilitarian for our rural application and have the potential to be dressed up!


Also available are mobile coops.  These tend to be on the smaller side and are more applicable for an urban setting with fewer chickens.  But, I do think they are cute!


Curious Pups!

There is a lot more to plan out, but this is some great inspiration. One thing I am concerned about is the dogs...I know our dogs will be so curious.  So, if anyone has some advice on how to train dogs not to eat free range chickens we welcome it!

Also, if you want more information about raising chickens yourself, I've come across a great blog and page on Facebook called Fresh Eggs Daily.  Check out her website and follow her page for daily tips.

Happy Friday!


Related Posts Plugin for WordPress, Blogger...

Thursday, January 16, 2014

Wallpaper

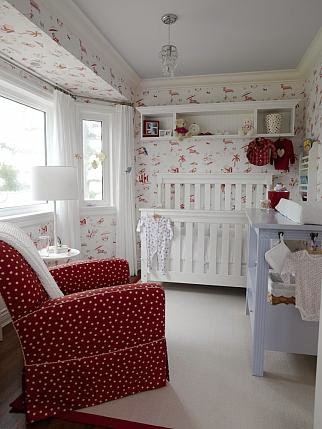
Wallpaper... I know it sounds old, tedious, a lot of work to apply or to change when it's outdated, but I do believe wallpaper is making a come back in the design world.  Or maybe it never left!  Whatever the case, wallpaper is a great way to add pattern, texture and focus to a room.

When designing, its good to think in layers, layer your design with patterns, textures and color.  If you choose to use wallpaper there are infinite possibilities for its application and it doesn't have to be straight forward: wallpaper applied to the walls.

Ease yourself into it.  Use wallpaper in a room that you don't want to change as often.  For example, a powder room.  In addition, a simple accent wall behind a bed, accent panels, or an accent on the backside of a bookcase are small areas and easy to update when you want to change the wallpaper.

Sarah Richardson: Powder Room
In a dining room, wallpaper is a great design solution to create a formal space.  Apply it under a chair rail with paint above or above paneling like the picture below.  To finish the room and add even more elegance, trim the ceiling with crown molding.
Sarah Richardson: Dining Room
But, if you want to go bold use it on all four walls of a room.


Sarah Richardson: Nursery and Kids Room
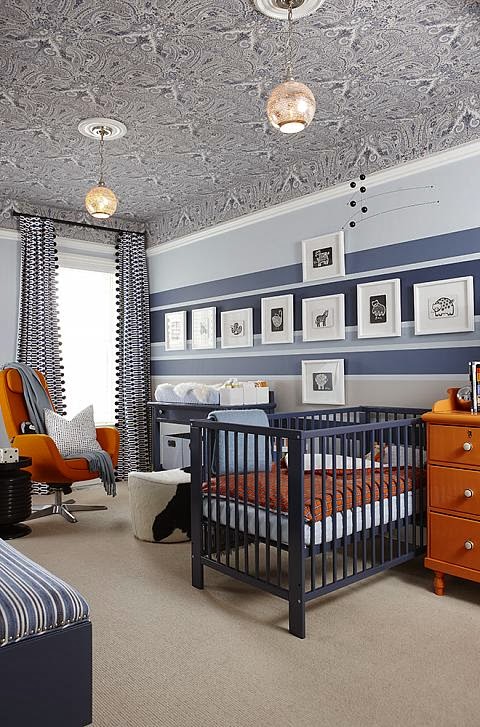
One of my favorite applications is on the ceiling.  Often the ceiling is forgotten when designing a room. The ceiling is the fifth wall, it deserves just as much attention and will add another dimension to your design.
Sarah Richardson: Nursery
If you watch HGTV then you are probably familiar with Property Brothers.  Drew, the brother that is the contractor, uses wallpaper as an accent in a lot of his designs.  After a bit of searching I was able to source the brand of wallpaper he uses, Graham and Brown Wallpaper Collections.
Here are a few of my favorites from their website:


These are just a few of the beautiful wallpapers on Graham and Brown.  Not only are these patterns fashionable, but their prices are pocket book friendly as well. 

Don't be scared of wallpaper! Embrace the variety and boldness it can add to your room and go for it! You won't be disappointed:)  


Related Posts Plugin for WordPress, Blogger...

Friday, January 10, 2014

Farm House Friday: Ground Breaking

The house build is in full swing.  Ground Breaking was back in December and since then the build has be going so quickly I haven't been able to catch up.  But, I am here now and wanted to share with you the progress.

Thus far we have dug out for the basement, poured footings, poured foundation walls, framed basement walls, set floor joists and started framing on the main floor.  Hopefully by the end of the weekend the entire house will be framed, roof trusses will be set and we will be ready for roofing next week.

Eeeek! I'm so excited and stressed at the same time.

If you have ever built a house you know its a full time job, which leaves little time for the rest of life because all your free time is consumed by site checks, plan updates, change orders (my husband takes care of those), ordering and lining up delivery of materials, choosing windows, choosing doors, and the list goes on and on.  I know you want to see the progress so I'll stop chatting away and show some pictures.

What an amazing sunset we admired this evening!  So many more of those to come.
The hole with rock in it.  Ready for footings and foundation. 
Footings

Foundation Walls
The Crane that set the beams.

Beam 1

Beams 1 and 2 being set.  Beam 3 lifted in the air. 
The Crane Lifting metal decking for the garage slab.

Basement Framing.  This is where the Rec Room will be when we finish the basement. 

Another Beam being set.  I believe this was the 5th one they set.  Basement framing for the walkout. 
Since these pictures were taken they have progressed to setting the floor joists and laying the subfloor. Next up is framing the main floor and setting roof trusses.

Its hard to believe that just a month and a half ago we began this journey.  It is going so quickly and fortunately the inclement weather has not slowed down the process. I have to say the guys working on the project are great and my husband deserves a lot of kudos too.  He works a full time job and manages our house build at the same time.

I want to leave you with a little teaser.  It is still early in the house build, however, we have started looking at finish materials, mainly flooring and tile for the bathrooms and kitchen.  Here is a little teaser...our master bathroom in concept.

Master Bathroom.  Sink Elevation.

Master Bathroom. Sink Elevation Tile Selection. 
Master Bathroom.  Walk-in-Shower.

Master Bathroom.  Shower Tile Selection.

Happy Friday!

xoxo,
Alissa  
Related Posts Plugin for WordPress, Blogger...